Becoming an IoT provider is an increasingly popular way for companies to deliver innovative new technology and services to their customers. One of the fundamental ways to accomplish this is to build and deliver an IoT application. For example, industrial OEMs can offer a subscription service that their customers can access to view the real-time telemetry and health details about their equipment.
Unlike traditional desktop applications, IoT applications are generally cloud-based services, which allow customers to remotely monitor their devices or equipment from anywhere in the world. Cloud-based services present new challenges when compared to desktop applications. The first is the concept of multi-tenancy. Nearly every cloud-based service is implemented as a multi-tenant application. This is because a single multi-tenant application is easier when onboarding customers, easier to scale, and easier to support in terms of updates and ongoing maintenance.
This article provides a step-by-step tutorial for how to architect a multi-tenant IoT application using the Losant IoT application enablement platform.
The IoT Application
The application that we’re building is based on our Industrial Equipment Monitor Template. This application provides a foundation that can be expanded with new features and capability to suit many other use cases.
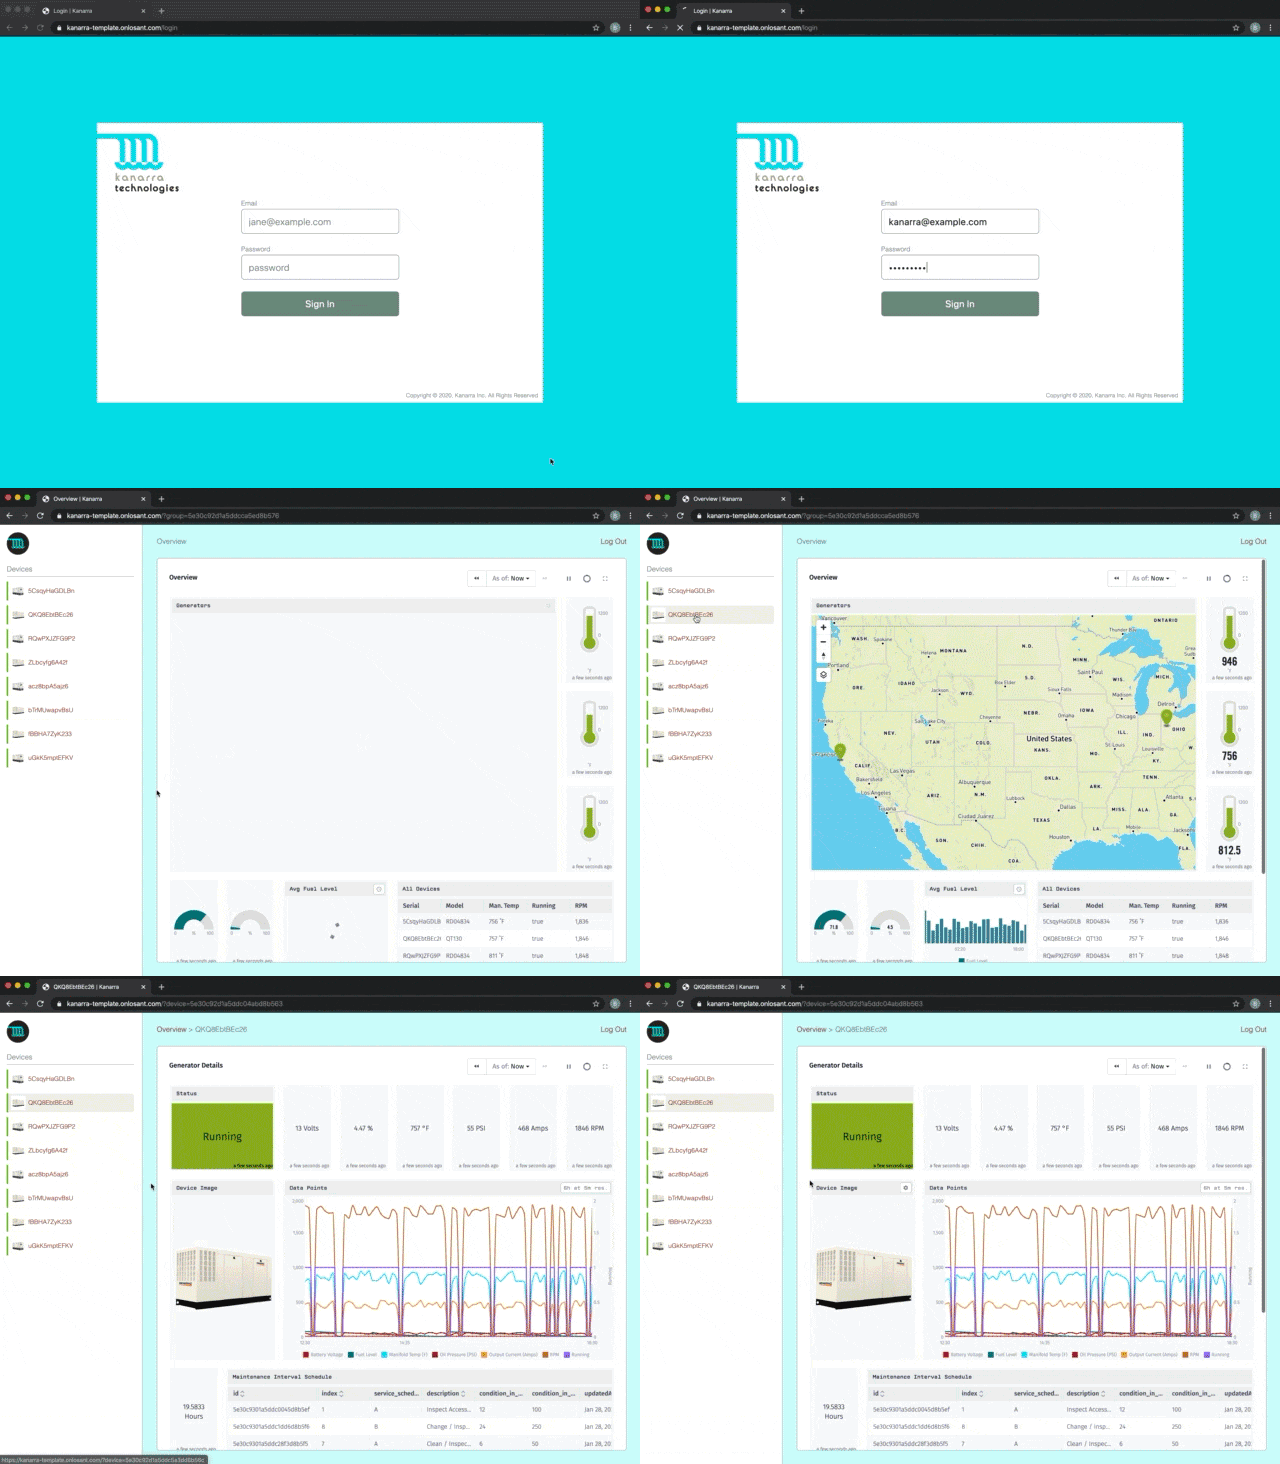
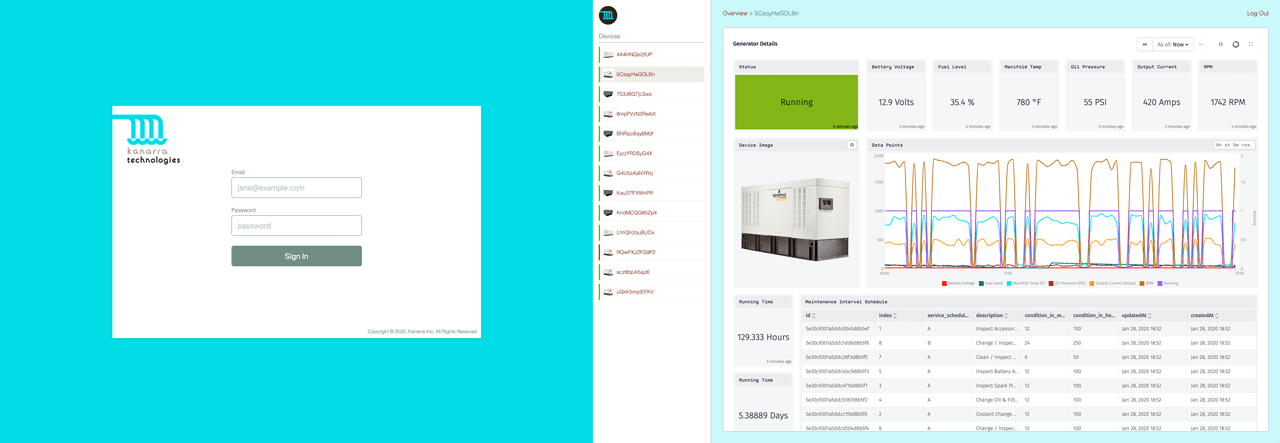
The overall application is a fully branded experience that an industrial OEM would provide to their customers. In this example, Kanarra is a hypothetical manufacturer of industrial power generators, which are commonly found behind schools and hospitals. With this application, Kanarra is able to offer a new service along with the generators they sell. Their customers are able to log in and view the health and status of their generators from anywhere in the world.
This article does not cover how data is collected and reported, but in most real-world scenarios like this, the company would utilize Losant Edge Compute to collect data directly from the existing industrial controller.
What is a Tenant in a Multi-Tenant Application?
A tenant can mean a lot of things, and changes based on the type of application you’re building. Regardless of the application, however, a tenant should always be an impenetrable wall between resources. Any resource (e.g. device) assigned to one tenant should never be accessible by another tenant.
In most applications, tenants represent customers. The customer could be an individual user (B2C) or an organization (B2B). In the case of Kanarra, who sells generators to organizations like school systems and hospital chains, the tenant is the organization. Each one of these tenants, in turn, has many users and many devices.
Do not confuse tenants with roles. A tenant controls which devices are associated with a specific user, but it does not control what that user is allowed to do with those devices. Depending on the application you’re building, roles can be an important part, however they will not be covered in this article.
The Tenant Hierarchy of a B2B IoT Application
Now that we know what a tenant represents within our IoT application, it’s helpful to see a graphical depiction of your tenancy hierarchy. Building a diagram like the one you see below can be useful when it comes to implementation.
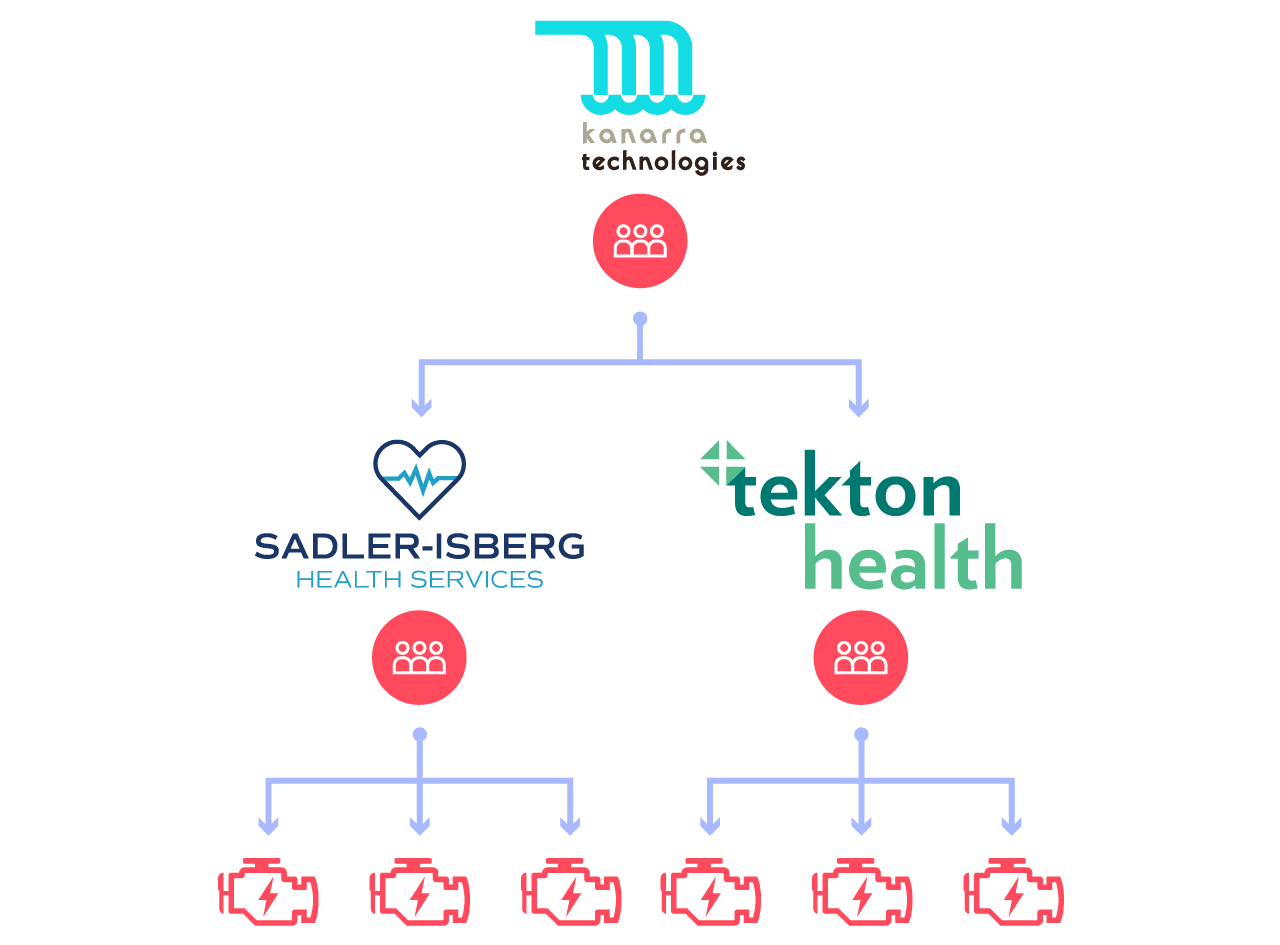
The diagram above shows two tenants, Sadler-Isberg and Tekton Health, both of which are imaginary hospital chains and customers of Kanarra. In this multi-tenancy example, each of these tenants can have any number of users and devices.
The most common tenancy model we see is one that includes access adoption. This means any user that is above a tenant will have access to that child tenant’s devices as well. Adopting access like this allows powerful hierarchies to be formed. For example, Kanarra could have distributors, which in turn have customers. You can then assign users to any level in the hierarchy and they will have access to their own devices and any device beneath them. For this reason, our diagram shows that Kanarra has users, but no devices, since those users will automatically adopt access from all child groups.
Representing a Tenant Hierarchy with Losant Experience Groups
Losant Experience Groups are specifically designed to represent nested tenancy hierarchies. Experience Groups are how users and devices come together. They can be assigned any number of users and associated with any number of devices. This association can then be used in many other places within Losant to request and validate a user’s access to a device.
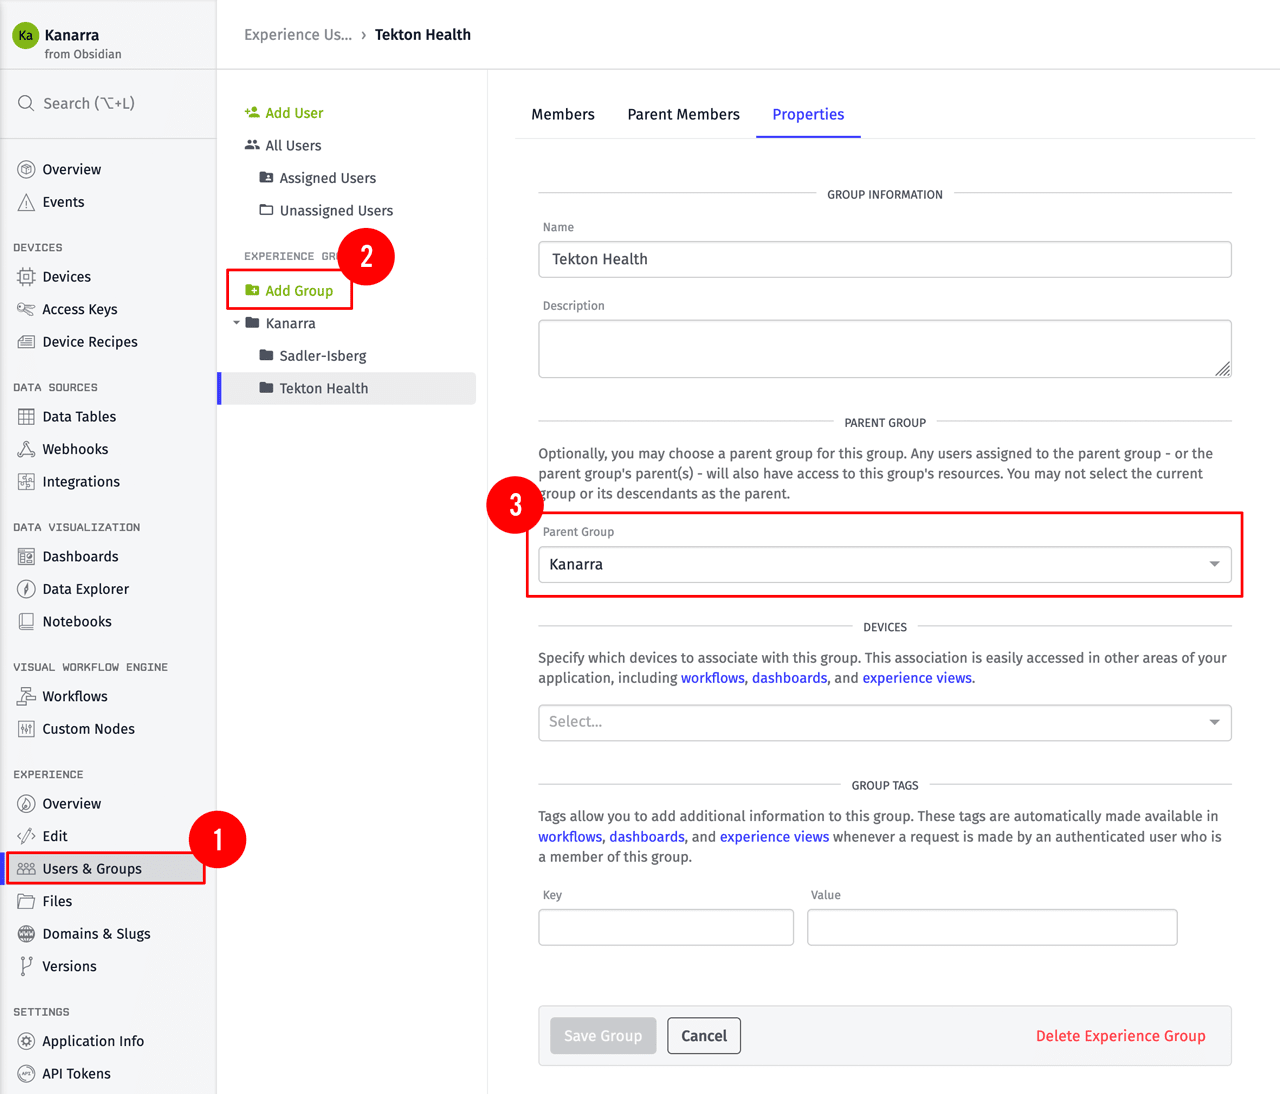
- You can access the Experience Groups functionality by clicking the “Users and Groups” main application menu item.
- To replicate our tenancy hierarchy, we’ll need three groups. Since Kanarra is the top-most group, create it first and keep the Parent Group set to “(No Parent)”.
- Lastly, create groups for Sadler-Isberg and Tekton Health. Since these are both children of Kanarra, set their Parent Group field to the Kanarra group created in step 2.
The groups created for this example are just one possible tenancy model. You can add as many groups as needed and nest them in any way you’d like. For example, the screenshot below shows an example hierarchy that incorporates regions and facilities. This allows you to assign users to a facility, a region, or an entire hospital chain.
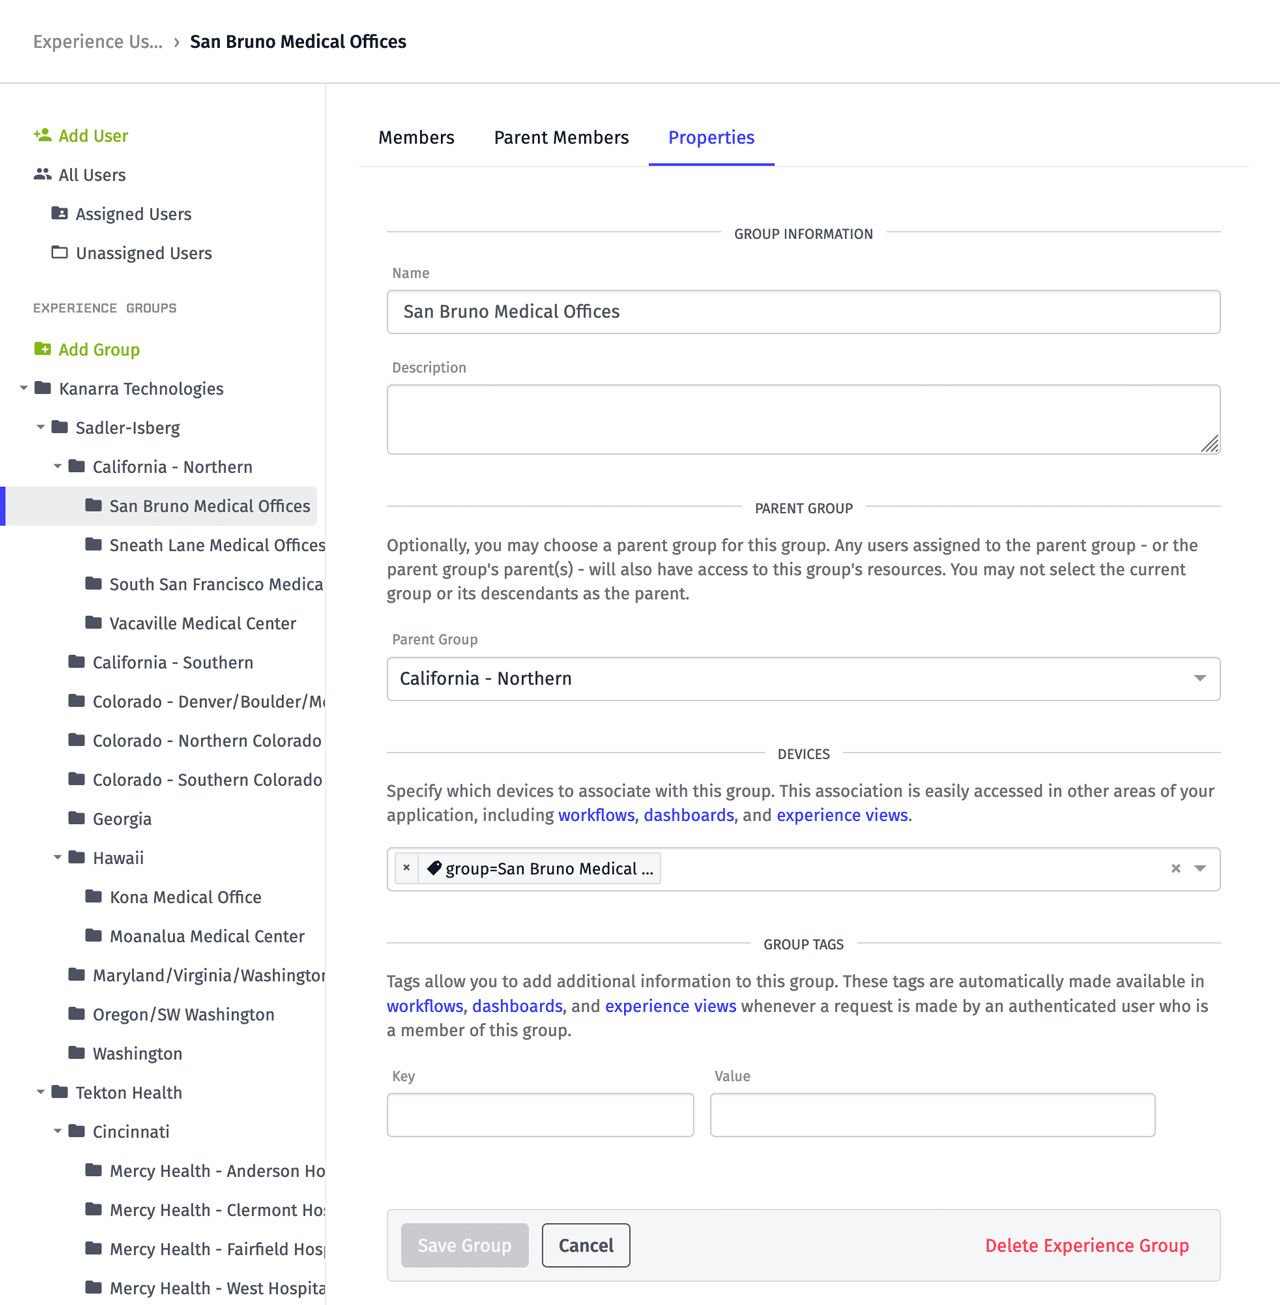
For this example, we manually created each group using Losant’s user interface, however it’s common to dynamically create groups using a workflow or the Losant API. This enables the creation of an onboarding flow that is integrated into your existing business process.
Assigning Users to Experience Groups
Now that our tenants are defined, the next step is to create Experience Users and assign them to the Experience Group that represents their tenant.
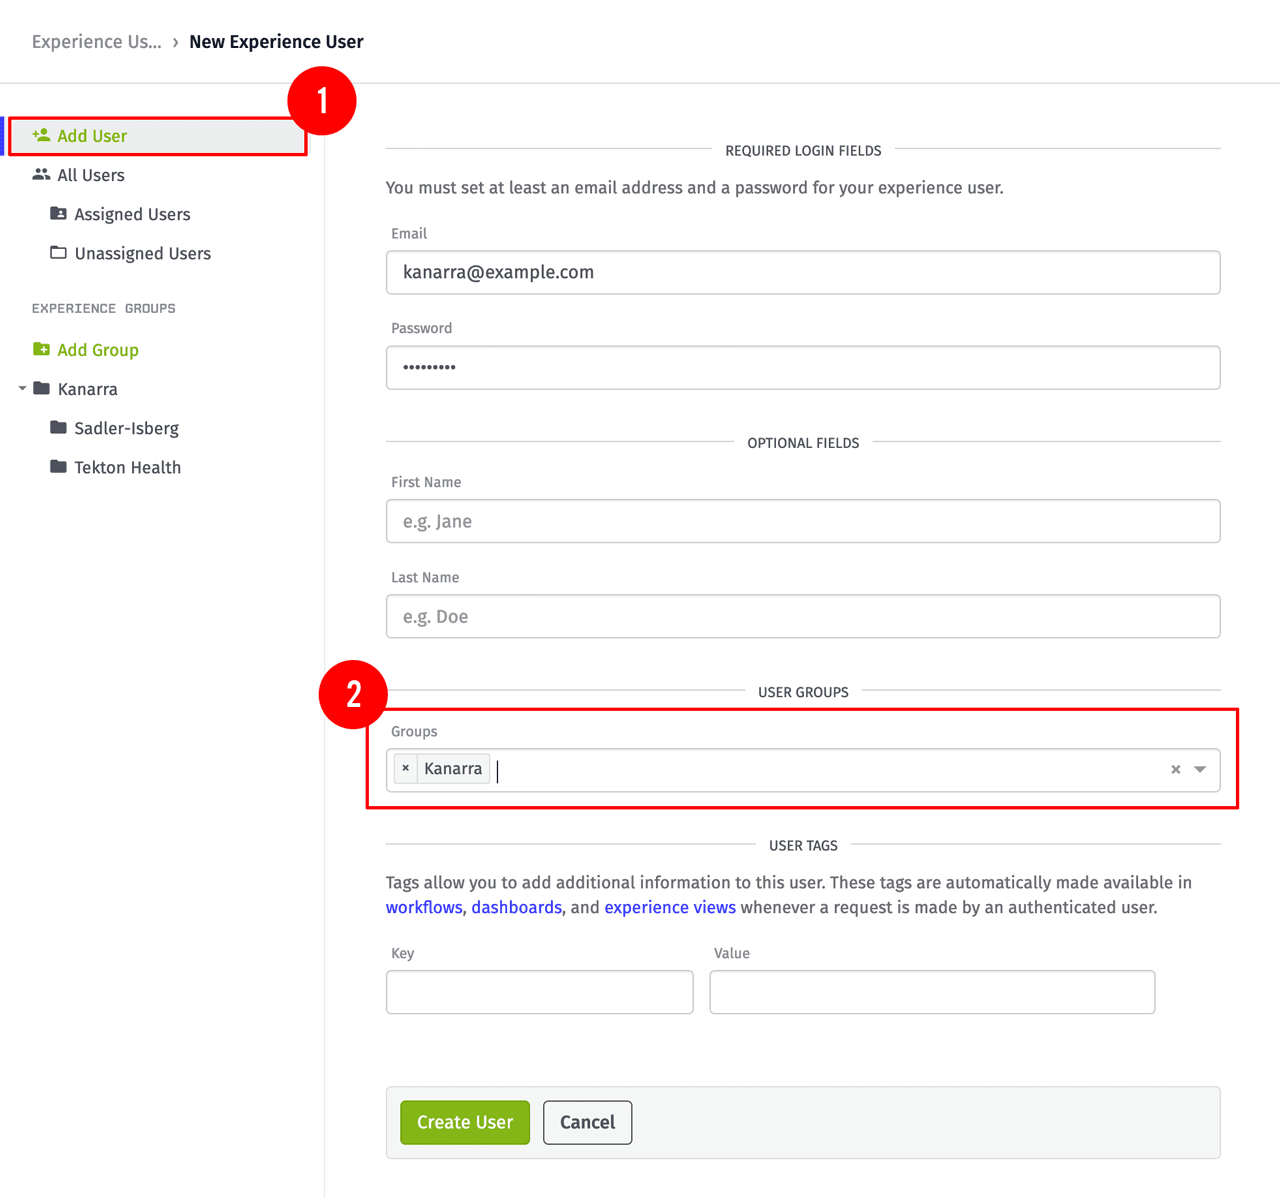
- You can add users by clicking the “Add User” link at the top of the “Users and Groups” page.
- When creating a user, an email and password are the only required fields. In order to assign these users to a tenant, select the group from the “User Groups” menu.
You can create as many users as you’d like, but for this example, I’ve created one user per group to keep things easy to understand. Below is a screenshot showing all three users.
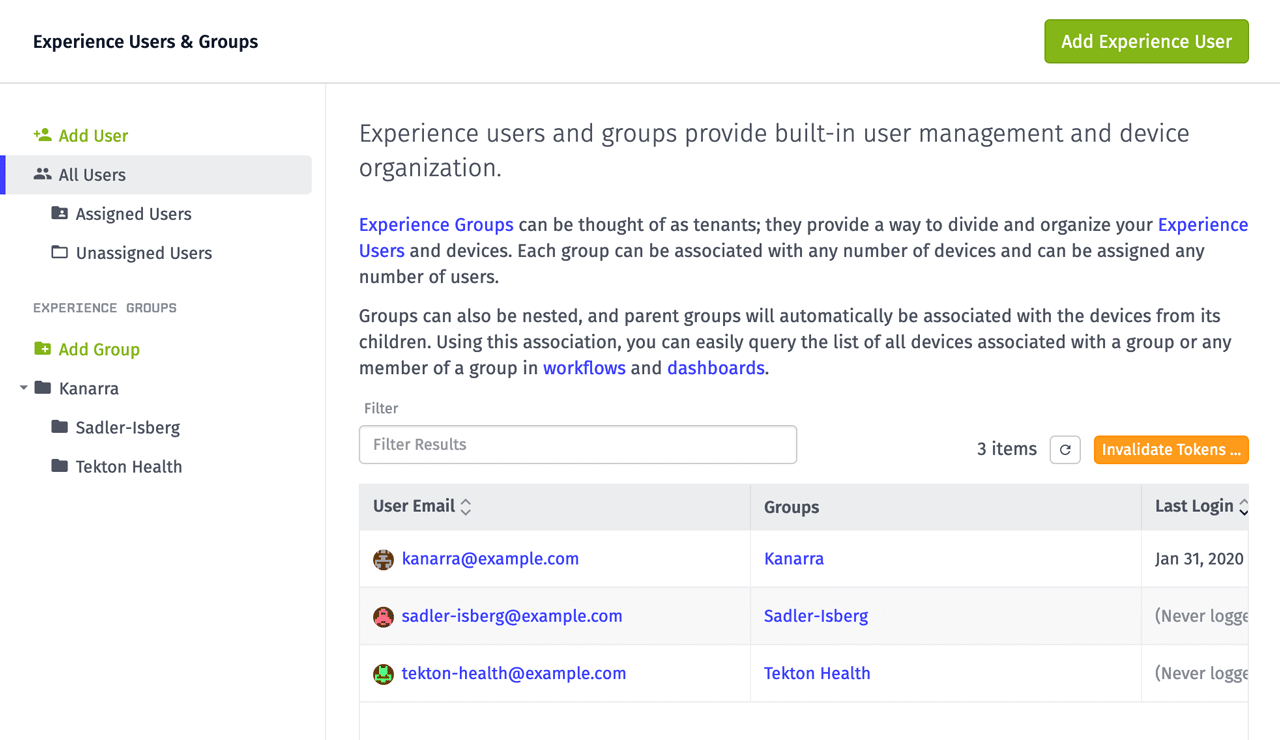
Just like with groups, users can also be dynamically created. Losant provides built-in email/password authentication, however this can be replaced by external SSO providers if needed. For this example, we’ll be using the built-in authentication.
Associating Devices to Experience Groups
One of the primary purposes for Experience Groups is to create an association between users and devices. This association then allows us to query a list of devices based on a user. We can also use this association to verify whether or not a user should have access to a specific device.
Groups can be associated to devices by Device Tags, individual device IDs, or a combination of the two. In most cases, the best practice is to use a device tag. This technique reduces the complexity when onboarding new devices, since any device created with a matching tag will automatically be associated with the group.
Below is a screenshot of the tags section on one of Kanarra’s generator devices.
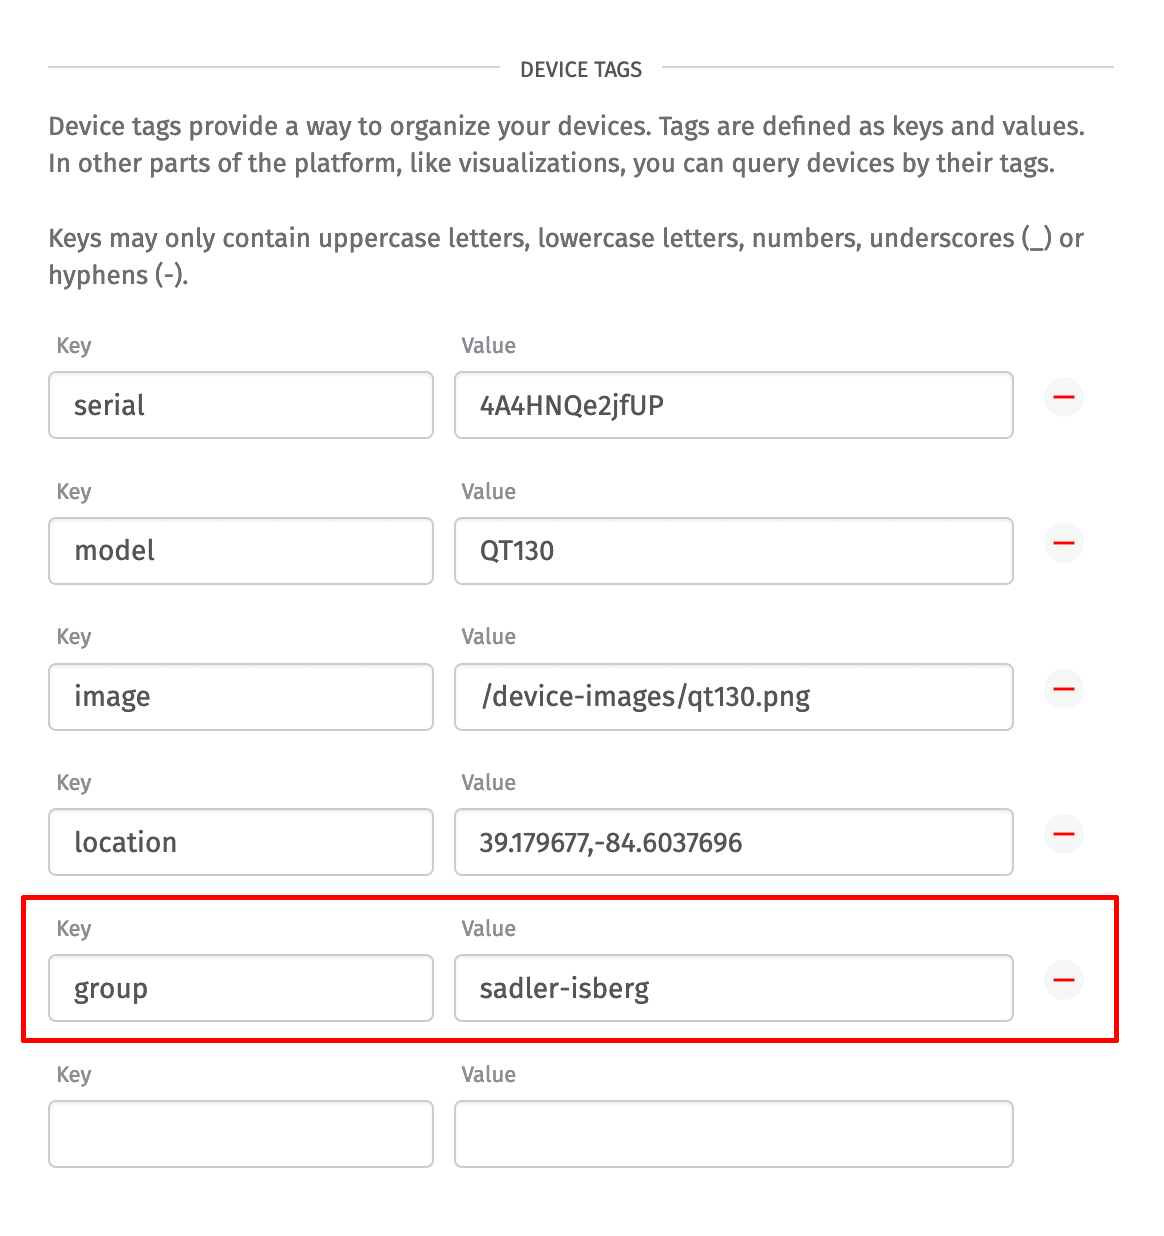
The tag key we recommend is “group” and the value we recommend is the name of the experience group it should be associated with. The tag’s key and value have no special meaning to Losant and can be anything you want. This is a best practice we’ve adopted because it’s human-readable and easy to debug.
Now that devices are tagged, we can return to each experience group and associate all devices based on these tags.
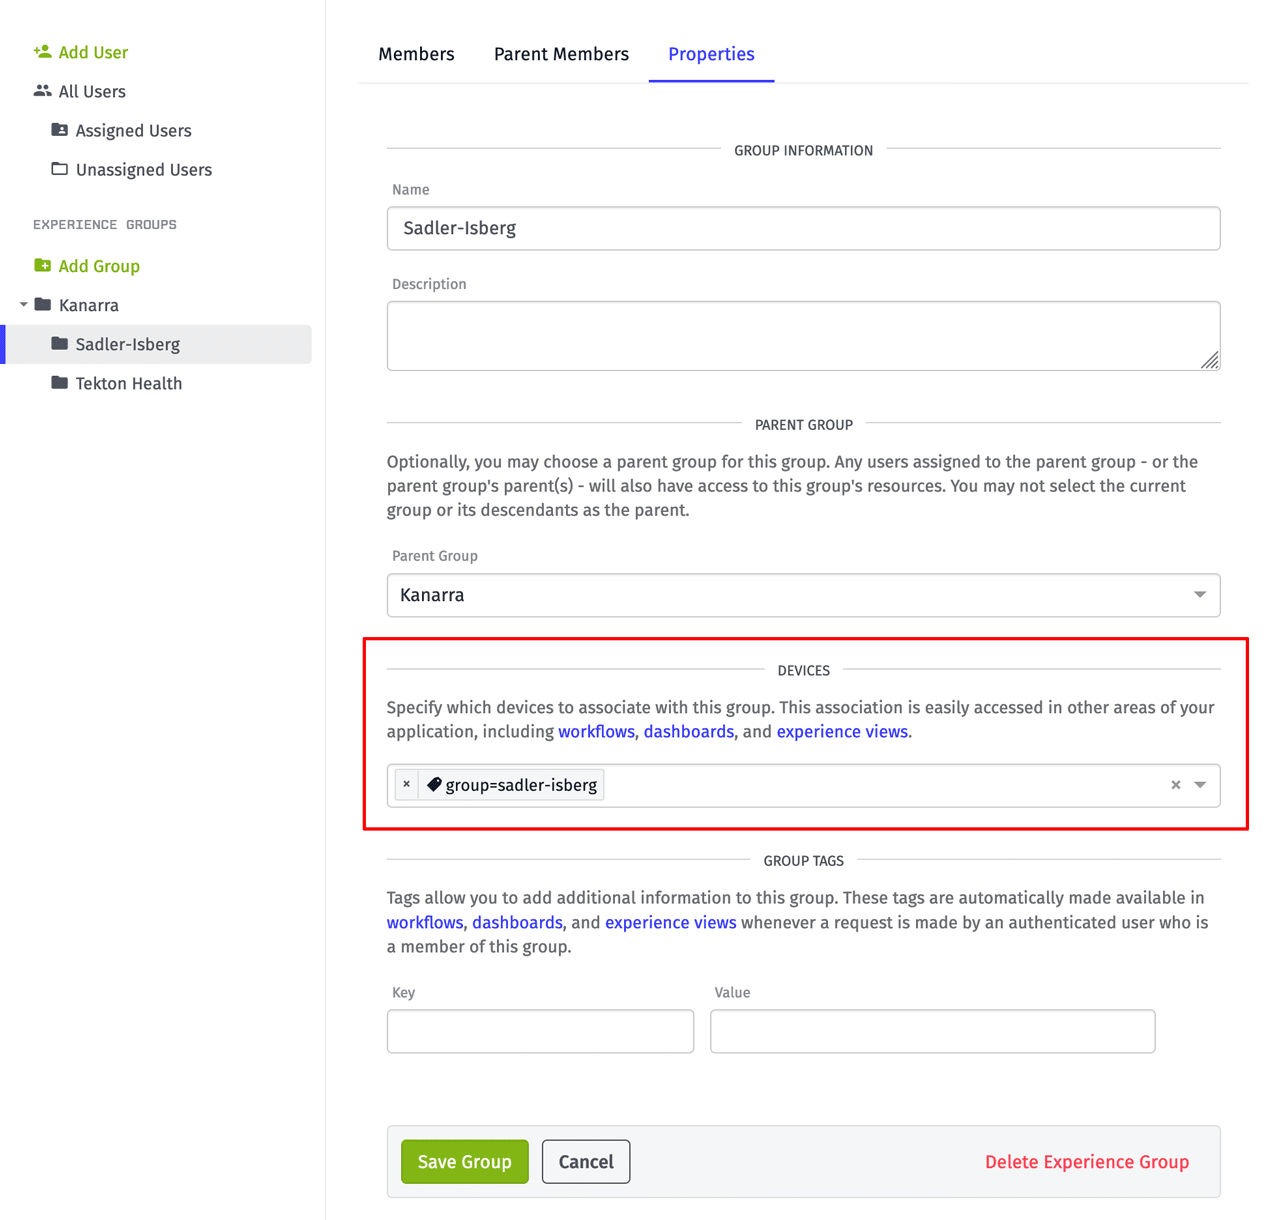
As shown in the screenshot above, the “Sadler-Isberg” experience group is now associated with every device that has a “group” tag with the value “sadler-isberg”. All other groups need to be updated similarly but with different tag values, in order to complete the device associations.
Testing Your Device Associations
At this point we’ve laid down a fairly robust multi-tenancy architecture that can be grown to include any number of tenants, each including any number of devices. At this point, it’s a good idea to test this model to ensure it’s working well.
There are many places where this tenancy model can be utilized. One of the simplest places is to request all devices associated with a user. This can be done using a workflow and the Device: Get Node.
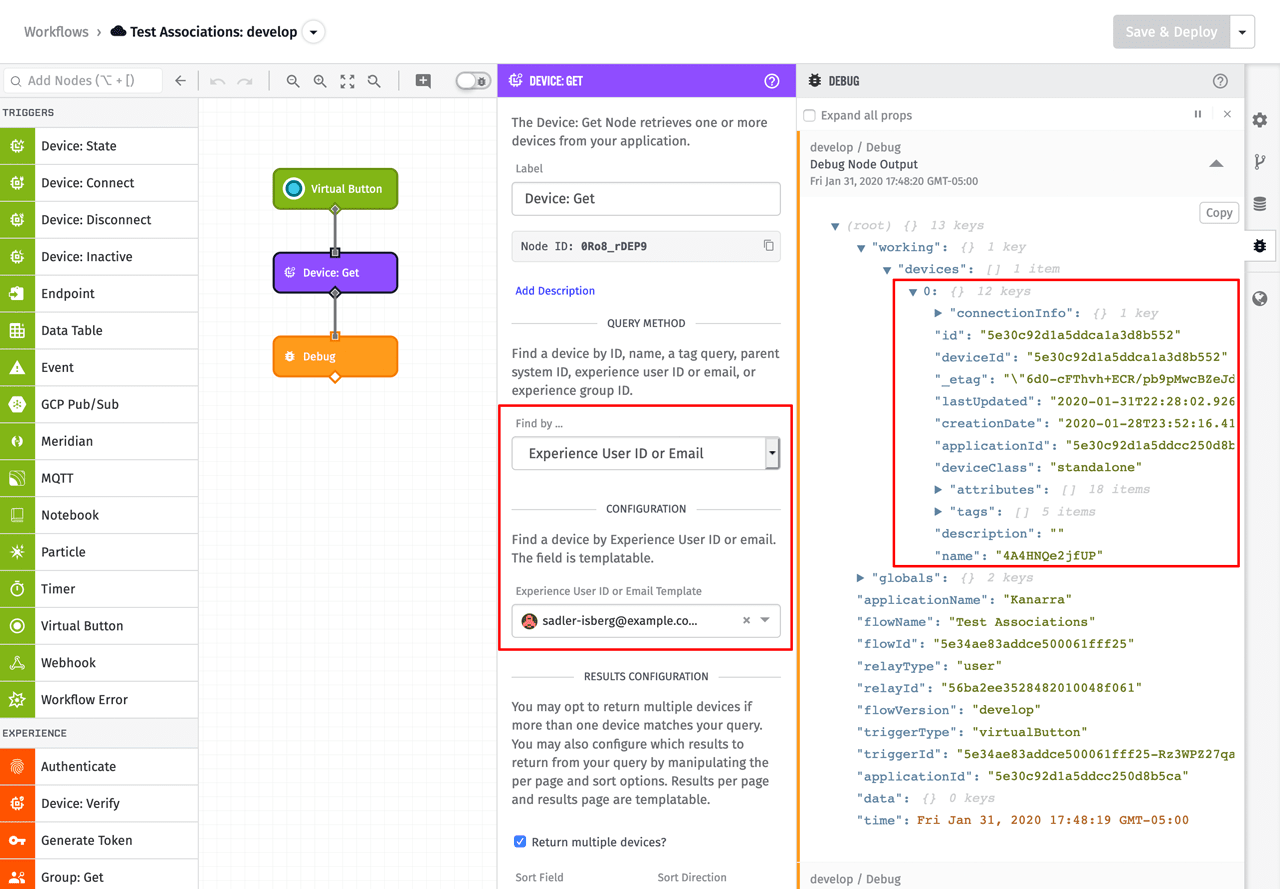
The Device: Get Node allows us to find devices using several different queries. For this test, the query is an experience user. In the screenshot above, the user that was selected is assigned to the Sadler-Isberg group, which is associated with all devices using the tag, “group=sadler-isberg.” Since only one device is tagged with that value, that’s what’s returned. You’ll want to test this with a few users to ensure you’ve properly configured your tenancy model and ensure devices are not showing up for the wrong user.
Summarizing the Architecture of a Multi-Tenant IoT Application
Nearly any multi-tenant IoT architecture you design will utilize the three main concepts that were covered in this article: tenants, users, and devices. How these concepts are implemented may change based on your platform of choice, however Losant represents these using Experience Groups, Experience Users, and Devices.
Tenants, which represent customers, are assigned any number of users. Devices are then associated with each tenant. This association is then used to determine which devices a user should be allowed to access when they log in.
If you have questions about anything covered in this article or need help extending this tenancy model to fit your own requirements, please let us know in the Losant Forums.

